Sheltering in Place Changed my Headstand Practice, and Here’s How to Change Yours Too!
June 11, 2020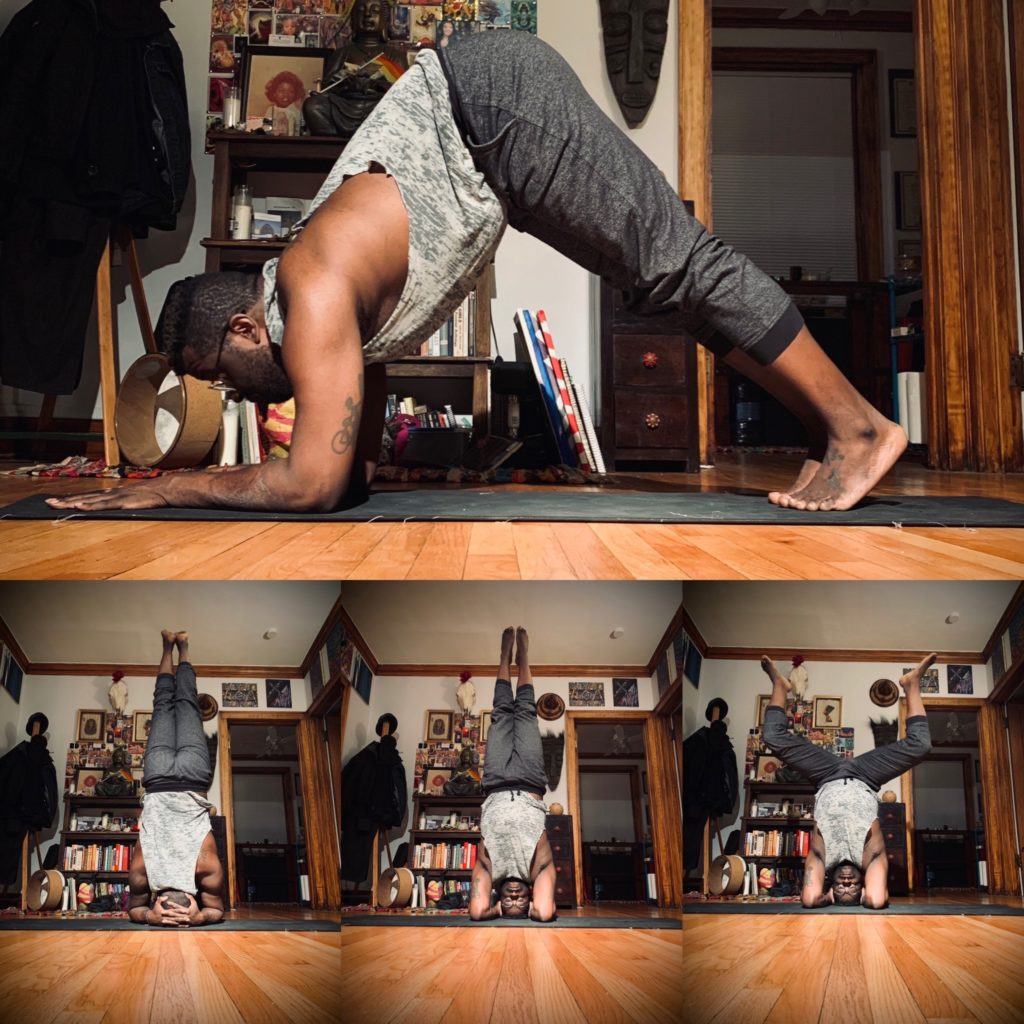 Does it feel like your world’s been turned upside down? Maybe we can Try to embrace it and let go through our yoga practice. To be truly free, we must be willing to accept changes of all kinds and face our fears head on (no pun intended). When attempting a headstand pose (and all inversions), we have to let go of the ground beneath our feet and open up to a totally new perspective. We will literally be turning our world upside down in efforts to set yours straight. During this time of quarantine I have been playing with the idea of how to change my perspective in life through yoga!! I will admit at the beginning of all of this, I was stricken with fear. But then I began to expand my perspective by doing more yoga.( I know total yoga teacher move) But… Something began to happen every time I moved into My headstand practice. It started feeling like weight was coming off my body, The stress and anxiety began to fall away as I held my body suspended in air. Then coming out of the pose I began to have this calmness and awareness enter my body!!! With just that one pose Perspectives begin to change. Allowing me to focus on what was really needed in this moment versus trying to control the things that were beyond my control.
So I figure why not make a list of things to share with this community on how to improve your headstand practice at the same time shifting your perspective and viewpoints!! Benefits of Inverting gets your blood flowing around your body—all that blood pumping into your head will improve your focus, and the anti-gravity effect combined with oxygenated blood will give you the effect of a mini face lift! Headstand also helps to drain fluid from your legs and ankles, and stimulates your adrenal glands, lymphatic system and digestion. Getting upside down is also known as ‘yogi coffee’—it wakes you up for the day! No wonder headstand is sometimes referred to as the ‘King of yoga poses.’
Before you launch into it, use these moves to help you build up strength, and you’ll be getting upside down in no time. (If you have any injuries or back or neck issues, this pose isn’t recommended). First things first, the basis of many yoga poses—but especially poses where you’re upside down—is core strength. You want the lift up into the headstand to be coming from your core, and the stability to be coming from your shoulders—NOT your head, to avoid injuries.
1. To build up a rock solid core, try going from navasana (boat pose) down into a low hollow body hold position, and then back up again. After a few reps, you’ll really be feeling the burn in your core!
2. Plank pose is a classic for a reason – it’s great for building up entire body strength.Try to build up to holding plank for 1 minute – if you practice this several times a week, you’ll definitely notice the effects. Try out all the variations of plank: high plank, forearm plank, side plank and forearm side plank – it’ll build up your core, whilst the forearm plank will be building up your shoulder and lat (latissimus dorsi) strength.
3. Utpluthih – this is a great pose for building core strength, and not just because it has a fun name (pronounced ‘oot palooti’). Fold your legs into lotus if you can, otherwise cross them into a cross-legged position. Place your hands flat on the ground either side of your hips, fingers slightly spread, palms and fingers pressing firmly down into the ground. Engage your core, press down into your hands and try to lift up off the ground. Try to keep your shoulders away from your ears, it’s easy to hunch them up as you try to lift off. You might not lift up your legs at all at first, and that’s ok – keep practicing!
4. Dolphin pose is perfect for building up strong shoulder muscles that you’ll need for holding your headstand steady. Dolphin pose is basically a forearm version of downward facing dog. Make sure that your arms are in line with your shoulders, and your forearms are straight – it’s easy for them to move around in this pose. Spread your fingers, keeping your palms and fingers pressing down into the ground. Another option in this pose is to use a block – place a block down (in the lowest variation) and make an L-shape with your thumbs and index fingers around the bottom corners of the block. Continuing to press in will ensure your arms stay in line, and that your shoulder muscles stay engaged.
5. Have you been practicing these poses for a while, and you’re starting to feel stronger? Time to try out headstand against a wall. Using the wall will help to conquer the fear of going upside down (often the scariest part!) and will make sure you don’t injure yourself from flipping over the other way.
Remove any rings, watches or bracelets – they can get in the way of your headstand grip. You want to be about a foot away from the wall. Kneel down, and then place your forearms on to the ground in line with your shoulders. To check that they’re in line, touch your opposite elbows. Once you’re in the right place, keep your elbows still, and clasp your hands together. The key here is to place the flattest part of the outside of your forearm on the ground, rather than the bone, which can be a bit wobbly. Place your head down in front of your clasped hands, lift your hips up in the air as high as you can go, and then tip toe your feet in as close to you as possible. The closer your feet can get, and the higher your hips are to start with, the better. This will make the pose much easier to get into.
Stay on your tiptoes, and then lift one leg up in the air at a time to practice getting the feeling for it. If you feel ready, try to lift both feet off the ground, keeping your legs bent until they’re high enough for you to straighten them all the way up. The wall is there to catch you if you wobble backwards! Don’t swing up, you could hurt your neck. If you’ve got someone to help you, they can assist you in lifting your legs up, and then help you balance.
Once you’re up, focus your gaze (drishti) on something not moving, Engage your core, keep your whole body super tight like it’s zipped up, press down through your arms and shoulders and engage your back muscles. Keep your pelvis tucked under to keep a straight line, instead of a ‘banana back’, which can happen if you collapse your lower back.
The key to all yoga poses is consistent practice – practice and all is coming!